How to Install a Wood Newel Post: Comprehensive Guide
Installing a wood newel post can be an essential part of your staircase remodeling project, providing stability and support to your railing system. This guide will walk you through the steps for installing a wood newel post using the Sure-Tite Fastener, ensuring a secure and sturdy installation. Keep in mind that this guide offers general instructions, so use your own judgment regarding measurements, angles, and tool choices.
Tools Required:
- Drill & Drill Bits (3/8″, 5/8″, 1-1/2″)
- Box End Wrench
- Construction Adhesive
Step 1 – Cutting and Preparing the Newel Post:
First, cut your newel post to the desired length. Locate the center of where your newel post will be installed on the floor and pre-drill all the necessary holes (Figure A). It’s important to drill the 1-1/2″ hole first, as the lag must be installed into solid bracing. Create an access hole on the side of the newel with the 1-1/2″ drill bit, then drill a 5/8″ hole up from the bottom. This will allow you to set the newel post down over the lag and secure it with the washer and nut.

Step 2 – Installing the Lag Bolt:
Screw the lag bolt into the floor, ensuring it’s secured into solid bracing. To create a temporary head bolt, you can use two nuts.
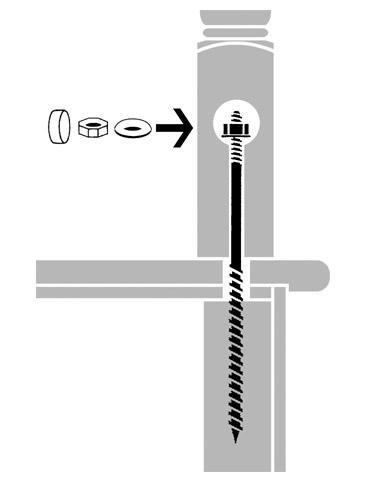
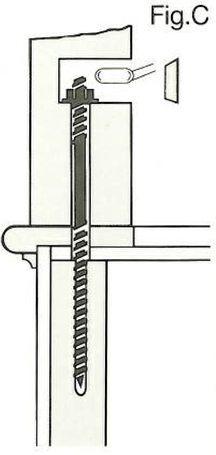
Step 3 – Securing the Newel Post:
Place the newel post over the lag, aligning it with the pre-drilled holes. From the 1-1/2″ access hole, insert the curved washer and nut. Use the 3/4″ box end wrench to torque down the nut securely. Stress the post in all directions to ensure stability and re-tighten as needed. Finally, apply construction adhesive to the access hole, tap in the plug, and sand it flat for a seamless finish.
Your wood newel post should now be securely installed, providing stability and support to your staircase railing system.