
20% OFF COUPON CODE = SAVE2026
How to Install Iron Newel Posts
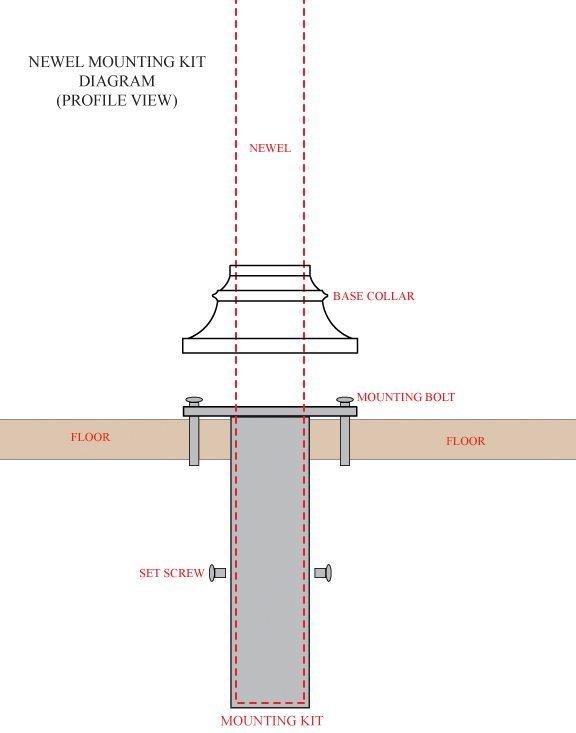
To install an iron newel post, bolt a mounting bracket onto the bottom of the newel, set it into an opening cut in the floor, and screw the bracket plate down. Then slide the base collar down to cover the bracket. Our iron newel mounting kit comes with the bracket, bolts, mounting screws and collar. For maximum stability, we recommend adding one can of EPC-7 epoxy per newel on top of the bolts.
Tools You’ll Need
- Jigsaw
- Drill (for a starter hole and the mounting screws)
- Tape measure
- Portaband or chop saw with a metal-cutting blade (if you’re cutting the newel)
Parts You’ll Need
- Iron newel post
- Iron newel mounting kit (bracket, bolts, 4 mounting screws and base collar)
- EPC-7 epoxy (one can per newel)
Step 1: Cut the opening in the floor
The bracket is too big for a drill bit, so you’ll cut the opening with a jigsaw. Trace the part of the bracket that goes into the floor where the newel will stand, drill a starter hole inside the line, and cut it out with the jigsaw. Keep it just big enough for the bracket to slide in. Make sure there’s solid wood under the floor for the mounting screws to bite into.
Step 2: Measure the newel
Measure from the floor to the bottom of the handrail where the newel will go. Account for the pin top on the newel and the thickness of the bracket plate, then cut the newel to length if needed. Test-fit the newel before you epoxy anything.
Step 3: Attach the bracket
Slide the base collar onto the newel first, then slide the bracket onto the bottom of the newel. Don’t skip that order. The collar has to go on before the bracket. Tighten the bolts to secure the newel to the bracket, then add one can of EPC-7 epoxy for maximum stability.
Step 4: Set the newel
Slide the newel and bracket into the opening in the floor. Make sure the newel is plumb, then screw the bracket plate to the floor with the 4 mounting screws from the kit.
Step 5: Slide down the base collar
Slide the base collar down over the bracket so it covers the plate and screws. That’s it.
Why add epoxy if the kit has bolts? The bolts hold the newel to the bracket, but over time they can wear into the powder coat and work loose. Adding one can of EPC-7 epoxy per newel on top of the bolts locks it in for good. We strongly recommend it.
Next step: how to install iron balusters. Not sure which newel you need? Read the different types of newel posts.
Iron Newel Install FAQ
What do I need to install an iron newel post?
An iron newel mounting kit (bracket, bolts, mounting screws and base collar), a can of EPC-7 epoxy, a jigsaw, a drill and a tape measure. You may also need a metal-cutting saw to cut the newel to length.
Do I need epoxy if the mounting kit has bolts?
We strongly recommend it. The bolts hold the newel, but over time they can wear the powder coat and loosen. One can of EPC-7 epoxy per newel, on top of the bolts, gives you maximum stability.
How do I cut the floor opening for an iron newel bracket?
Trace the bracket on the floor, drill a starter hole inside the line, and cut it out with a jigsaw. The bracket is too big for a drill bit.
How do I measure an iron newel post?
Measure from the floor to the bottom of the handrail where the newel goes, and account for the pin top and the bracket plate. Test-fit before you epoxy.
What does the base collar do on an iron newel?
It slides down over the mounting bracket to hide the plate and screws. Slide it onto the newel before you attach the bracket.